Enscape settings, and the equivalent controls in Lumion, V-Ray and Corona, all do the same four jobs under different names: they control how much light is simulated, how clean the image gets, how the camera behaves, and how the result is graded. Learning the pattern makes every engine easier than learning each one separately.
The underlying method is the same across every engine, and the open textbook at pbrt.org describes what the settings are actually controlling.
The mistake most people make is treating settings as quality dials. Some of them affect accuracy, some affect noise, and confusing the two is why renders take hours and still look flat. Enscape settings hide that distinction behind a single quality slider, which is convenient and worth understanding.
This covers what to set in each engine, and which settings actually change the image.
The Four Groups That Matter

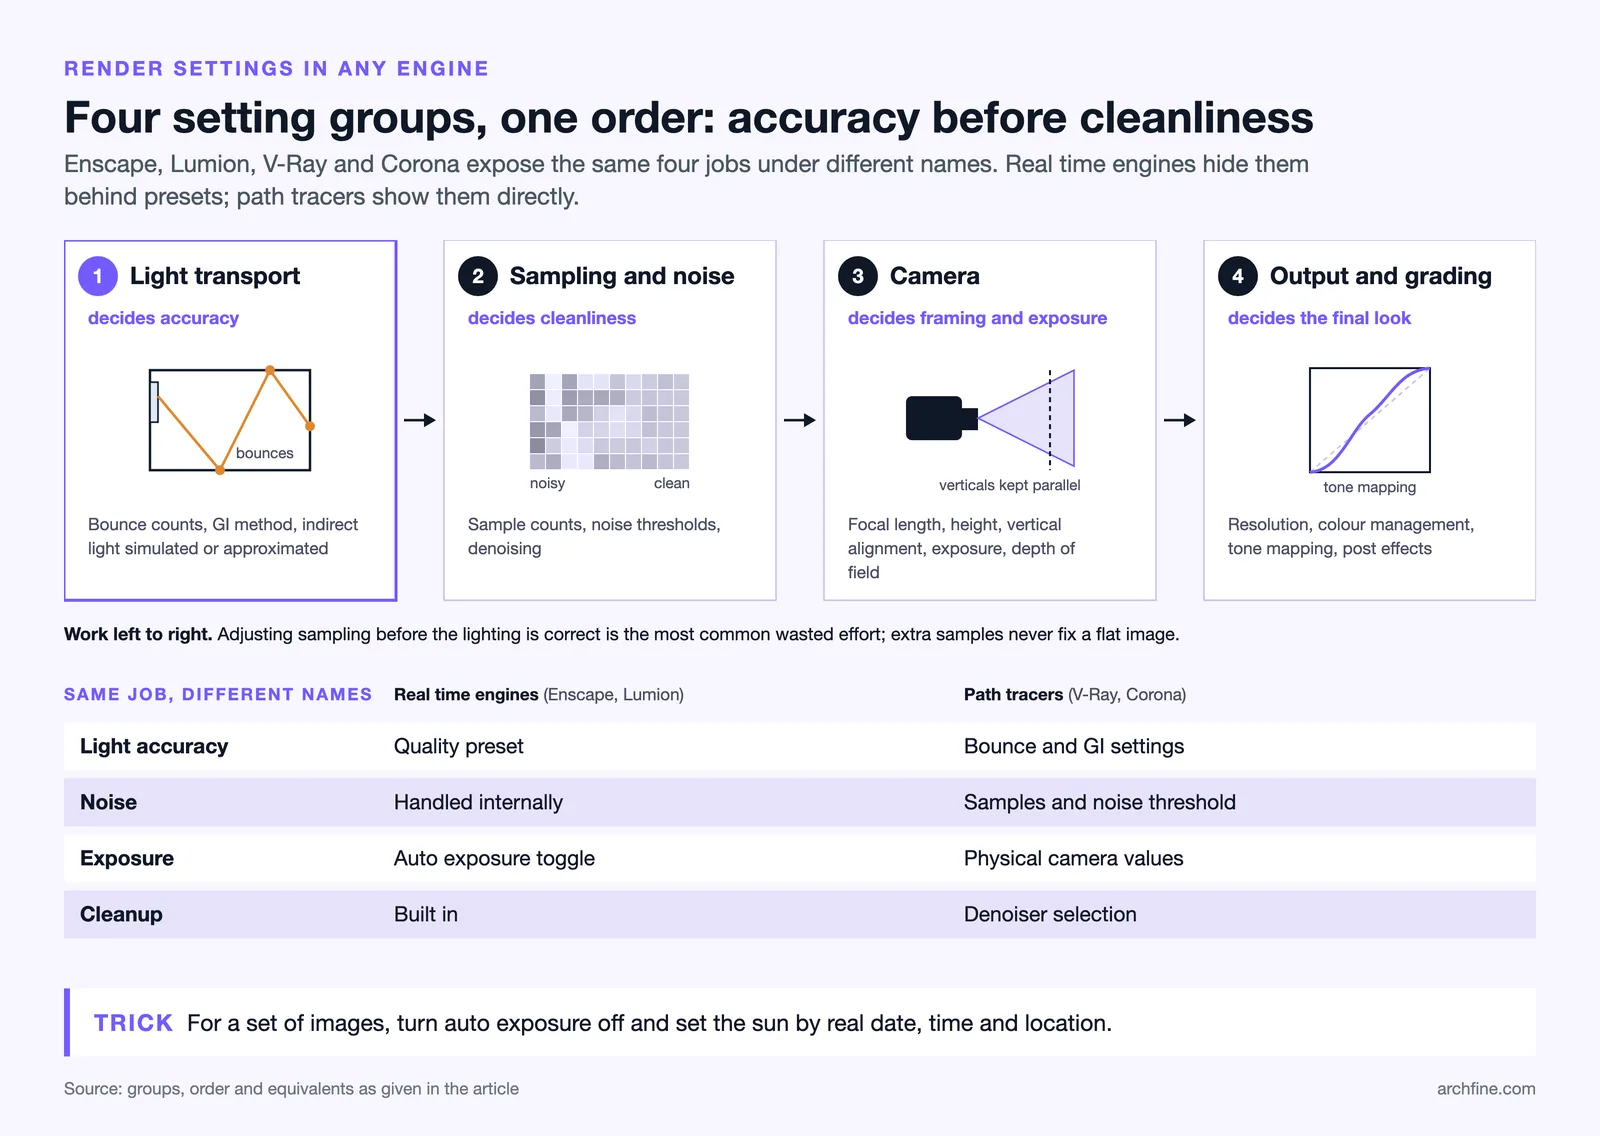
Light transport decides accuracy. Bounce counts, global illumination method and whether indirect light is simulated or approximated. Getting this wrong produces a flat image no amount of sampling fixes.
Sampling and noise decides cleanliness. Sample counts, noise thresholds and denoising. These affect how long you wait, not whether the lighting is right.
Camera decides composition and exposure. Focal length, height, vertical alignment, exposure and depth of field.
Output and grading decides the final look. Resolution, colour management, tone mapping and any post effects applied in the engine.
Work through them in that order. Adjusting sampling before the lighting is correct is the most common wasted effort in architectural rendering.
💡 Pro Tip
Build one test scene and keep it. A simple interior with a window, three materials and a figure, rendered in every engine you use, tells you what each setting actually does far faster than reading documentation. It also gives you a reference when an engine updates and behaviour changes.
Enscape Settings

Enscape, published by Chaos, is designed around speed, and the settings reflect that. The quality slider changes several underlying values at once, which is convenient and hides what is happening.
The settings worth attention are the rendering quality level, auto exposure, and the atmosphere controls for sky and sun position.
Turn auto exposure off for anything final. It adjusts brightness between views, which means a set of images from one model have inconsistent exposure and look like separate projects.
Set the sun by real date, time and location rather than by dragging until it looks good, since shadow direction is information rather than decoration.
Lumion
Lumion separates real time preview from final render, and the settings that matter live in the render dialog rather than in the viewport.
Quality level and the choice of effects stack determine both look and time. The effects system is where most of Lumion’s character comes from, and restraint produces better architectural images than stacking six effects.
Shadow settings deserve specific attention, since the defaults are soft enough to lose the crispness that makes exterior images read.
V-Ray and Corona

Both are path tracers with settings that expose the underlying method directly, which makes them harder to learn and more predictable once learned.
In V-Ray the important controls are the noise threshold, which decides when the renderer stops, and the global illumination settings that determine how indirect light is calculated. Documentation from Chaos covers the material side, and the render settings follow the same logic.
Corona simplifies this deliberately, with a single quality control and adaptive sampling that handles most decisions. For architectural work the defaults are unusually well chosen, and the comparison between the two sits in our guide to V-Ray and Corona.
Equivalent settings across engines
| Job | Real time engines | Path tracers |
|---|---|---|
| Light accuracy | Quality preset | Bounce and GI settings |
| Noise | Handled internally | Samples and noise threshold |
| Exposure | Auto exposure toggle | Physical camera values |
| Cleanup | Built in | Denoiser selection |
Settings People Get Wrong
Auto exposure left on for a set of images is the most common, and it makes a consistent set impossible.
Bounce count too low in interiors is the second, producing the flat look that people then try to fix with fill lights, as our guide to global illumination explains.
Sample counts pushed far beyond what denoising would have handled is the third, and it is where most wasted render hours go, a balance covered in our guide to reducing render noise.
Depth of field applied in engine is the fourth. It bakes a decision into the image that could have been made afterwards, and architectural images rarely benefit from it anyway.
Plugin and Workflow Settings
Rendering plugins for SketchUp and Rhino carry their own export settings that decide what geometry reaches the engine. Hidden layers, section planes and scenes all behave differently between plugins.
Check what actually exported before blaming the render settings. Missing geometry and reversed normals look like rendering problems and are not.
Where an engine offers render passes, enable them by default. They cost almost nothing and they give you control after the render, as our guide to render post production covers.
Bottom Line: Every engine exposes the same four groups of settings under different names. Fix lighting first, use denoising rather than brute force sampling, turn auto exposure off for a set, and set the sun by real date and location.
Building a Studio Preset
Settings decided once and saved are worth more than settings optimised on every project. Most architectural images fall into three or four categories, and a preset for each removes a whole class of decisions.
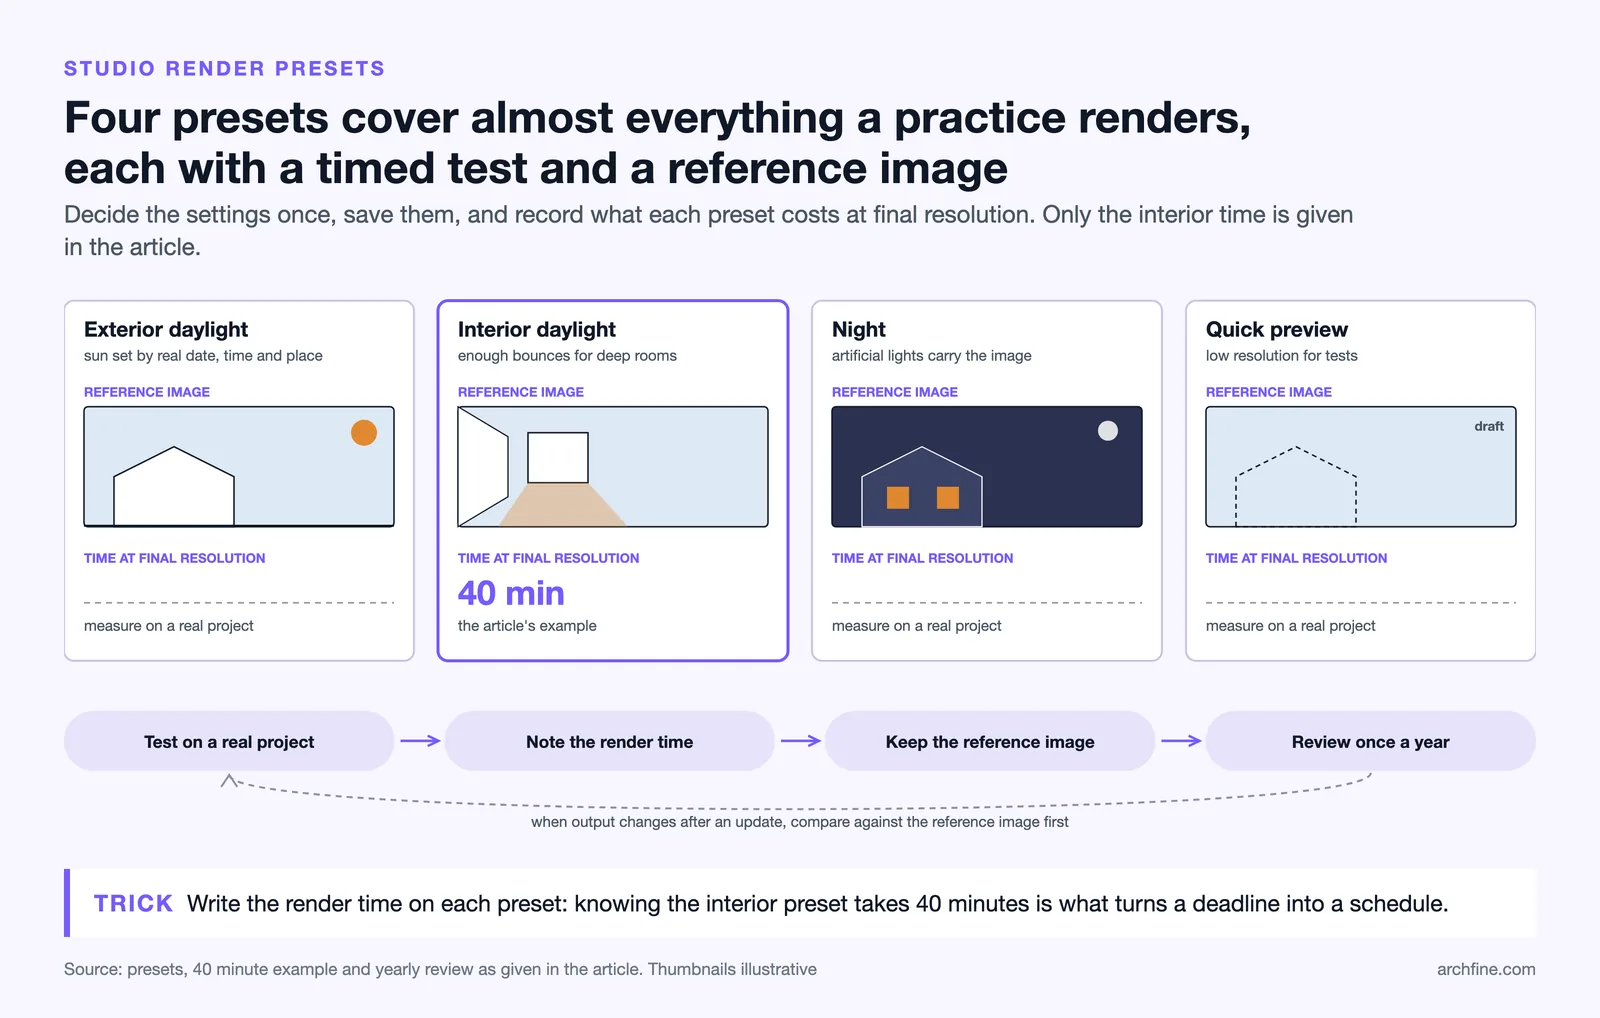
An exterior daylight preset, an interior daylight preset, a night preset and a quick preview preset covers almost everything a practice produces.
Test each preset on a real project before adopting it, and note the render time it produces at final resolution. Knowing that the interior preset takes forty minutes is what makes deadline planning possible.
Reviewing presets after updates
Engines change defaults and add features, and a preset built two versions ago may be working around a limitation that no longer exists. Revisiting them once a year is enough.
Keep a reference image rendered with each preset. When output changes unexpectedly after an update, comparing against the reference identifies what moved far faster than reading release notes, which is the same reasoning behind the test scene approach in our guide to render denoising.
Diagnosing a Slow Render
Before adjusting anything, find out what is actually costing the time. Most engines report where time was spent, and the answer is frequently not what people assume.
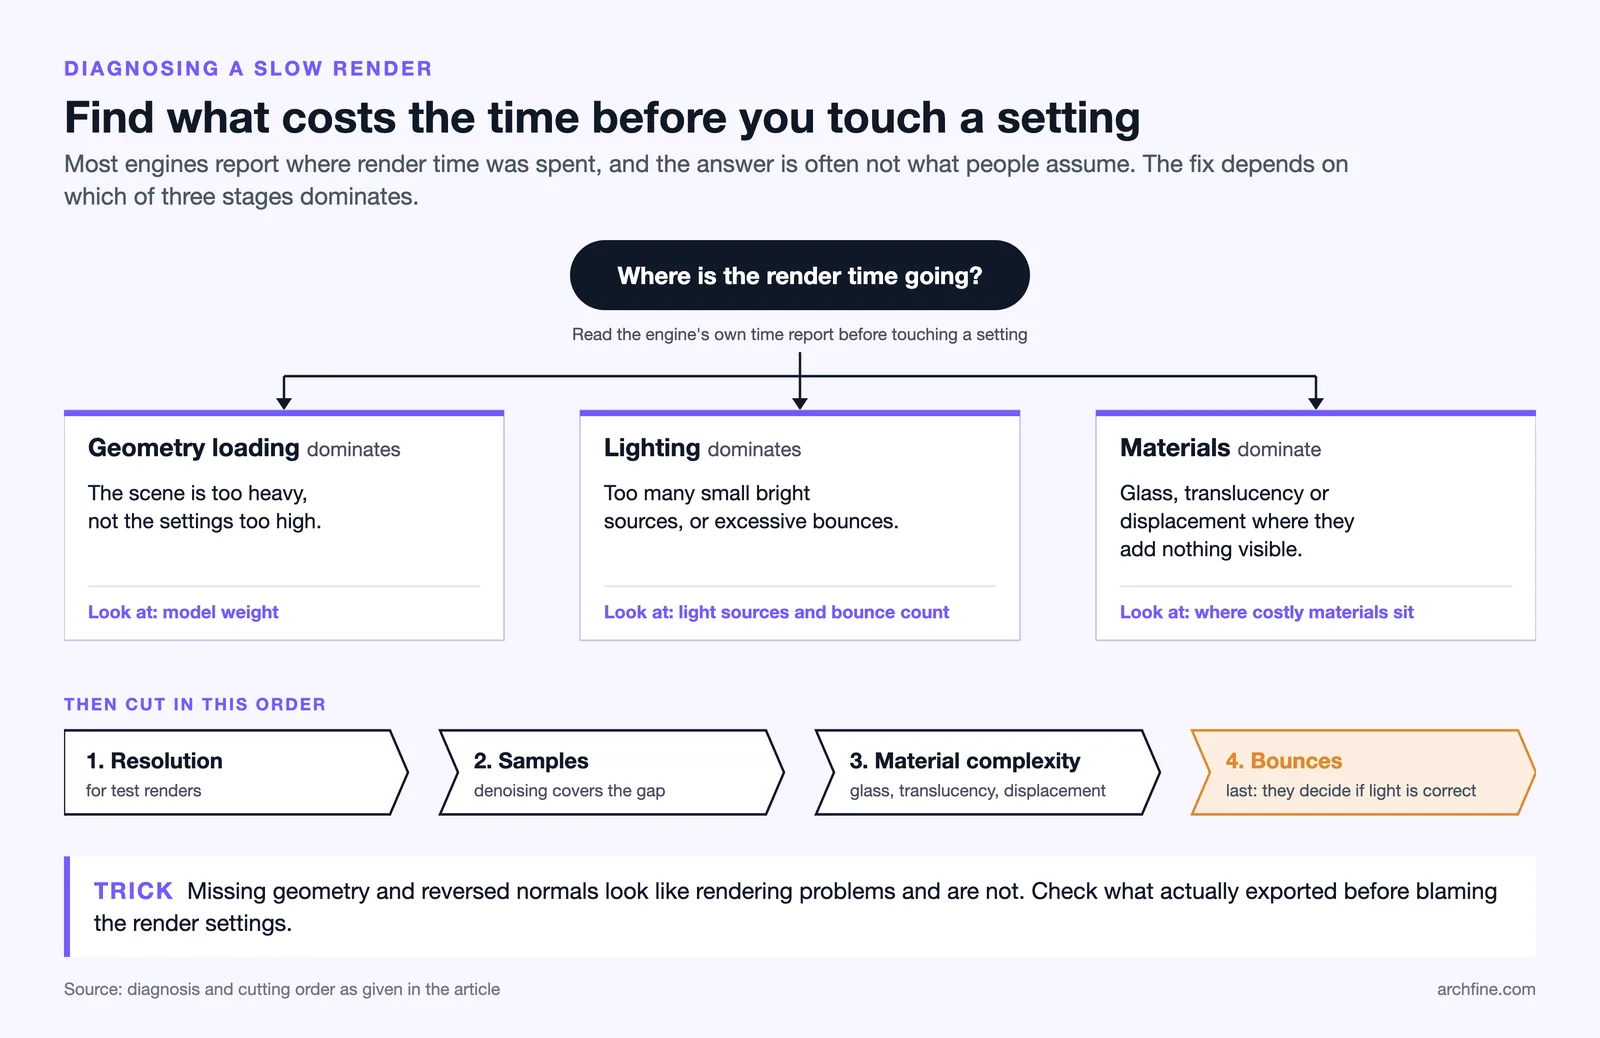
Geometry loading dominating means the scene is too heavy rather than the settings too high. Lighting dominating usually means too many small bright sources or excessive bounces.
Materials dominating points at glass, translucency or displacement, all of which are expensive and often applied where they contribute nothing visible.
The order to cut
Reduce resolution first for tests, then samples, then material complexity, and only then bounces. Bounces are the last thing to cut because they affect whether the lighting is correct rather than how clean it looks, as our guide to global illumination explains.