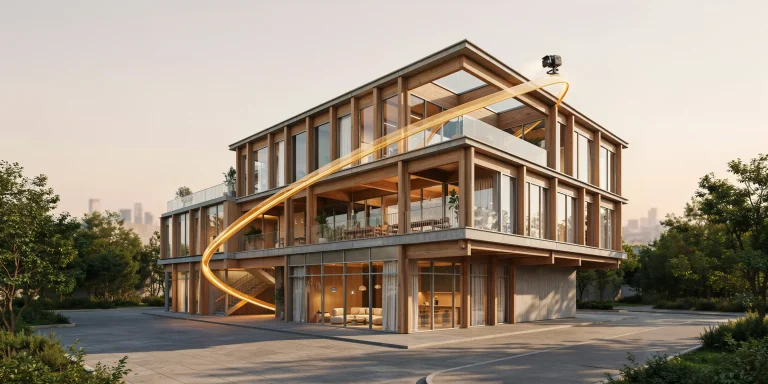
A section perspective render slices a building along a vertical plane and then renders the cut in three-dimensional perspective, revealing interior space, structure, and circulation in a single image. It merges the analytical clarity of a section drawing with the spatial depth of a perspective view, which makes it one of the most persuasive tools for competitions and client presentations.
Plans and elevations flatten a building into orthographic lines. A section perspective render does the opposite: it keeps the measured logic of a cut while letting you look into rooms, watch light fall across a stair, and read how floors stack and connect. For architects who need to explain a complex interior, this hybrid drawing carries more information per image than almost any other view. This guide covers what the technique is, how to build one across the main rendering tools, and how to use it to tell a clear spatial story.
What Is a Section Perspective Render?
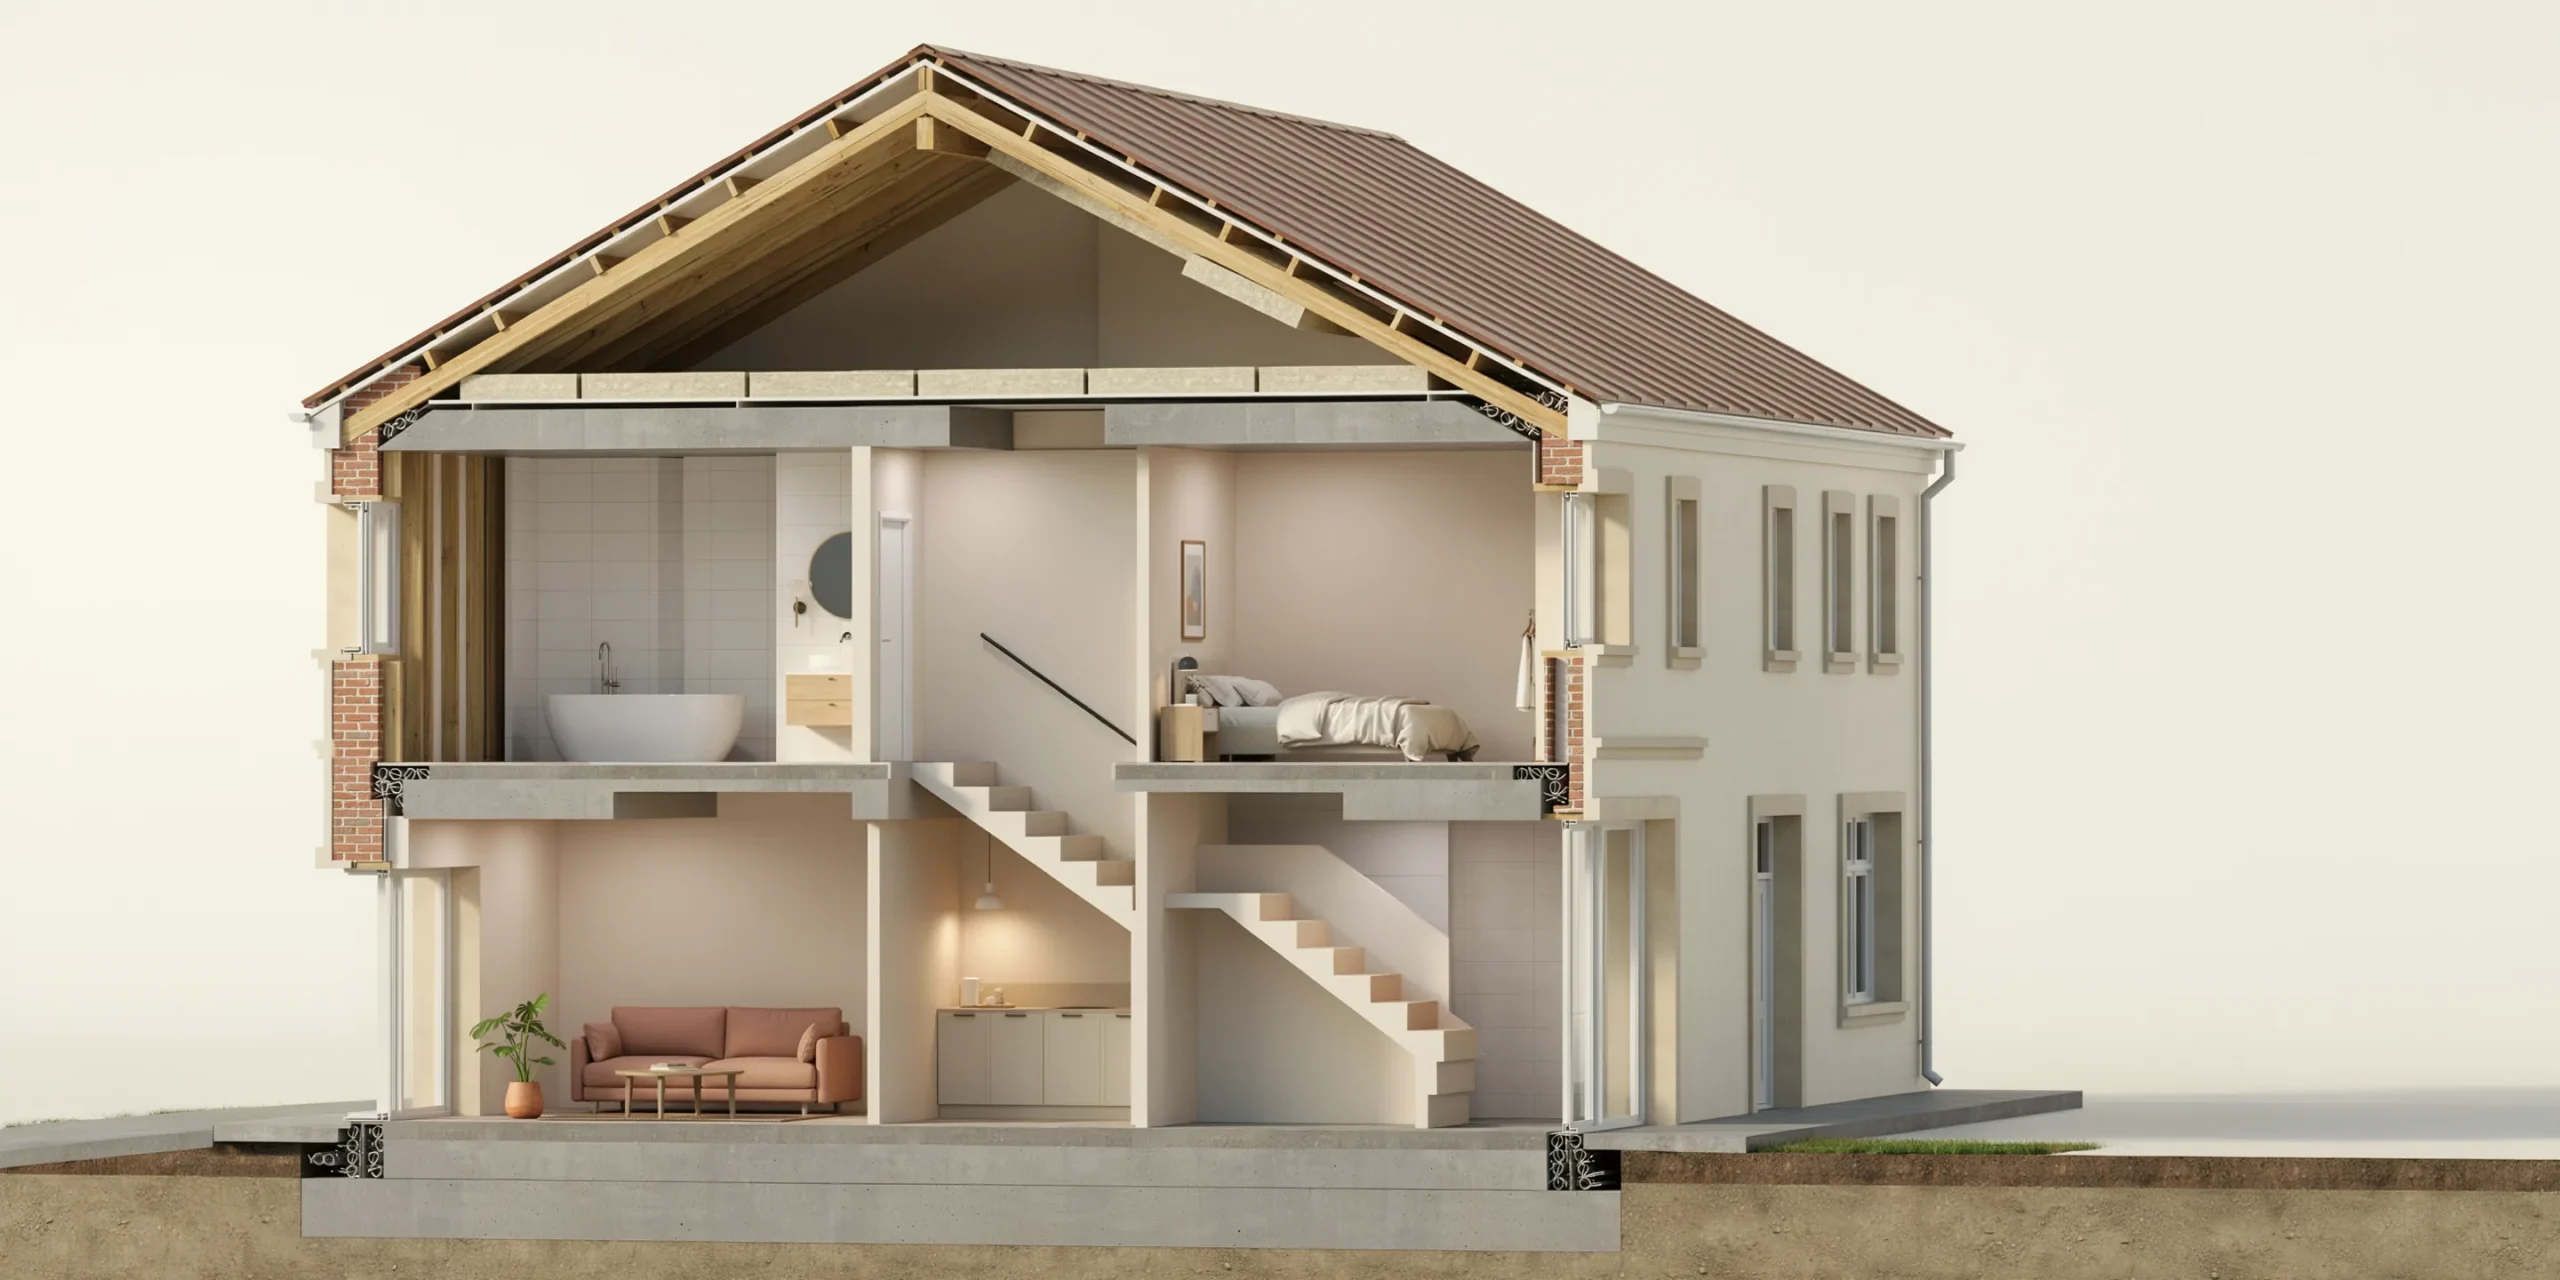
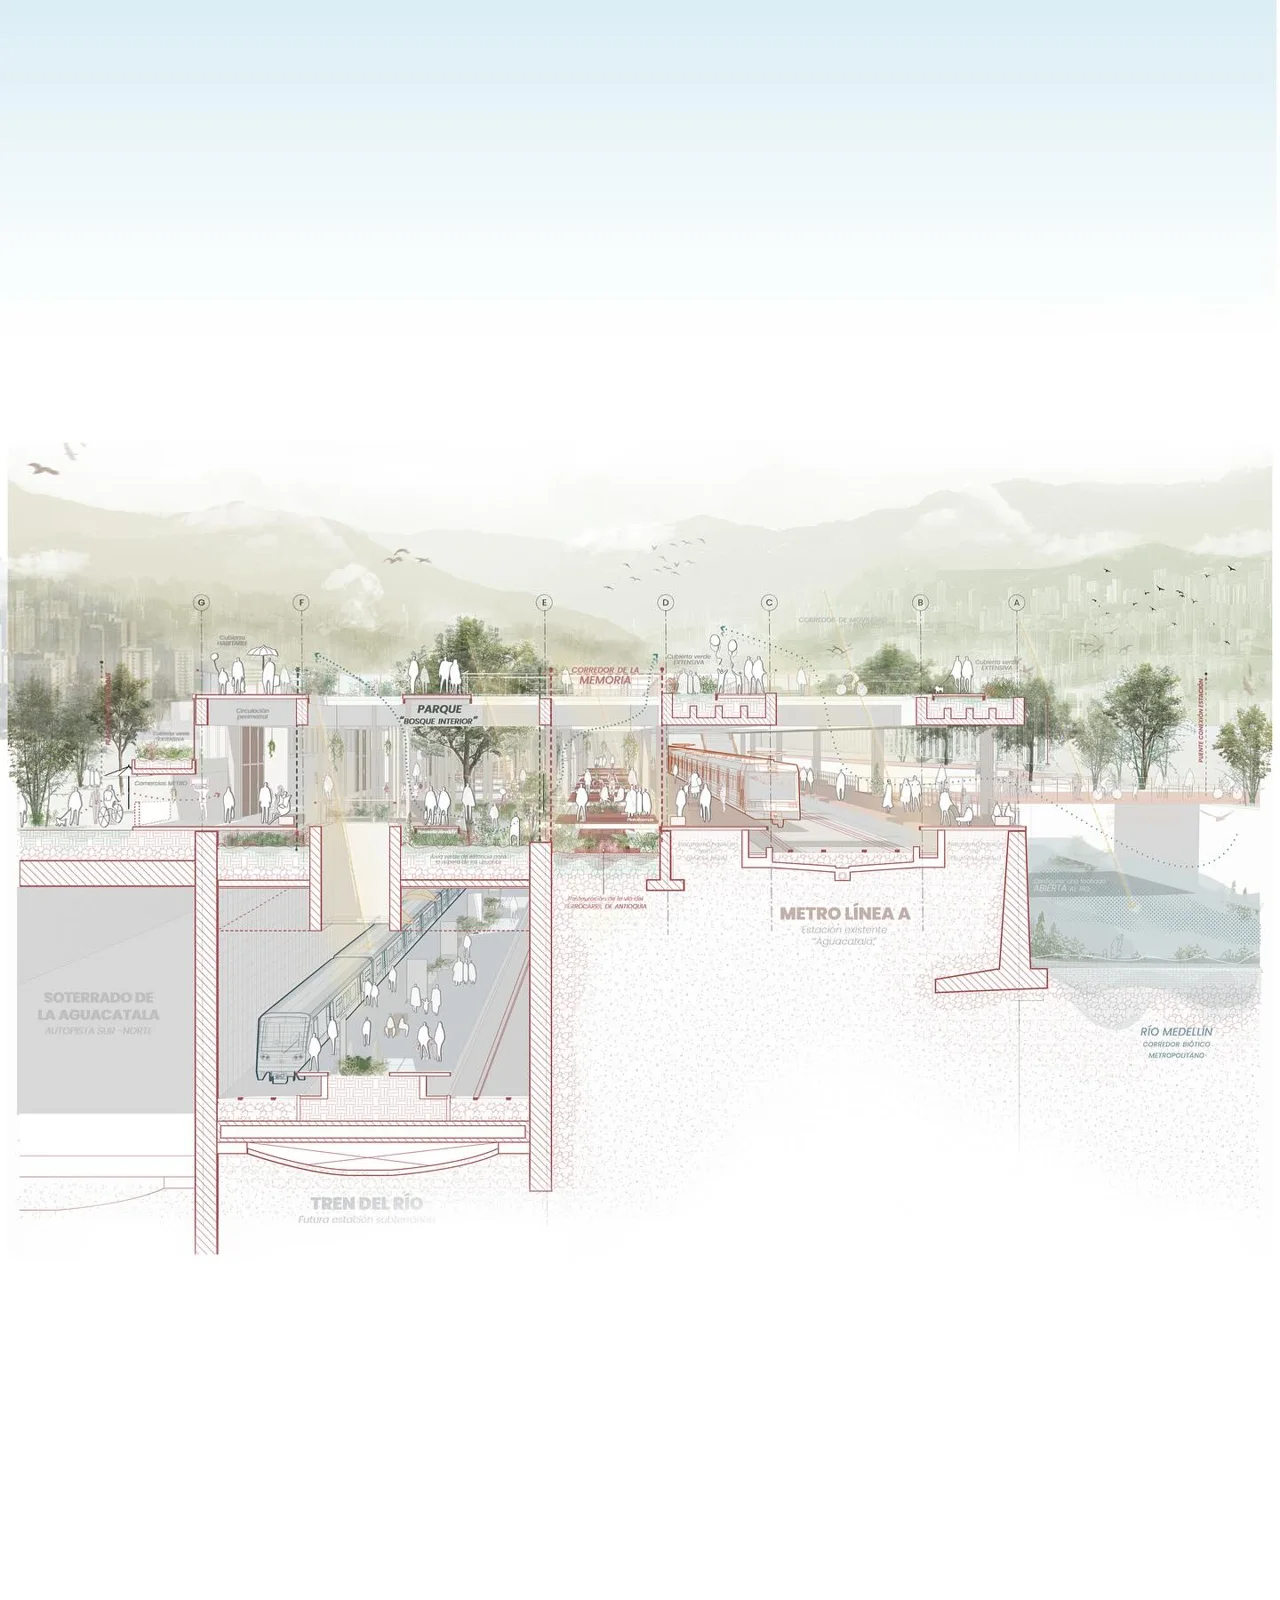

A section perspective render is a view where a cutting plane removes part of the building envelope, and everything behind that plane is drawn in perspective rather than as a flat projection. The cut face reads like a traditional section, showing slab thicknesses, wall build-ups, and floor levels, while the receding interior gives depth, furniture, occupants, and atmosphere. The result sits between a section drawing and an interior render.
This form has a long history in architectural representation. Scholars such as Robin Evans, in The Projective Cast, argued that the way architects draw shapes the way they think, and the section has always been the drawing that exposes the relationship between bodies and space. A section perspective render simply pushes that idea into a photographic register, where material, light, and scale figures make the spatial argument legible to non-architects.
🎓 Expert Insight
“Drawing in architecture is not done after nature, but prior to construction; it is not so much produced by reflection on the reality outside the drawing, as productive of a reality.” Robin Evans, architectural theorist and author of The Projective Cast
Evans frames why the section perspective matters: it is a generative view, not just a record. Cutting a model open often exposes spatial problems you would never catch in plan.
How Does a Sectional Perspective Differ From a Standard Section?
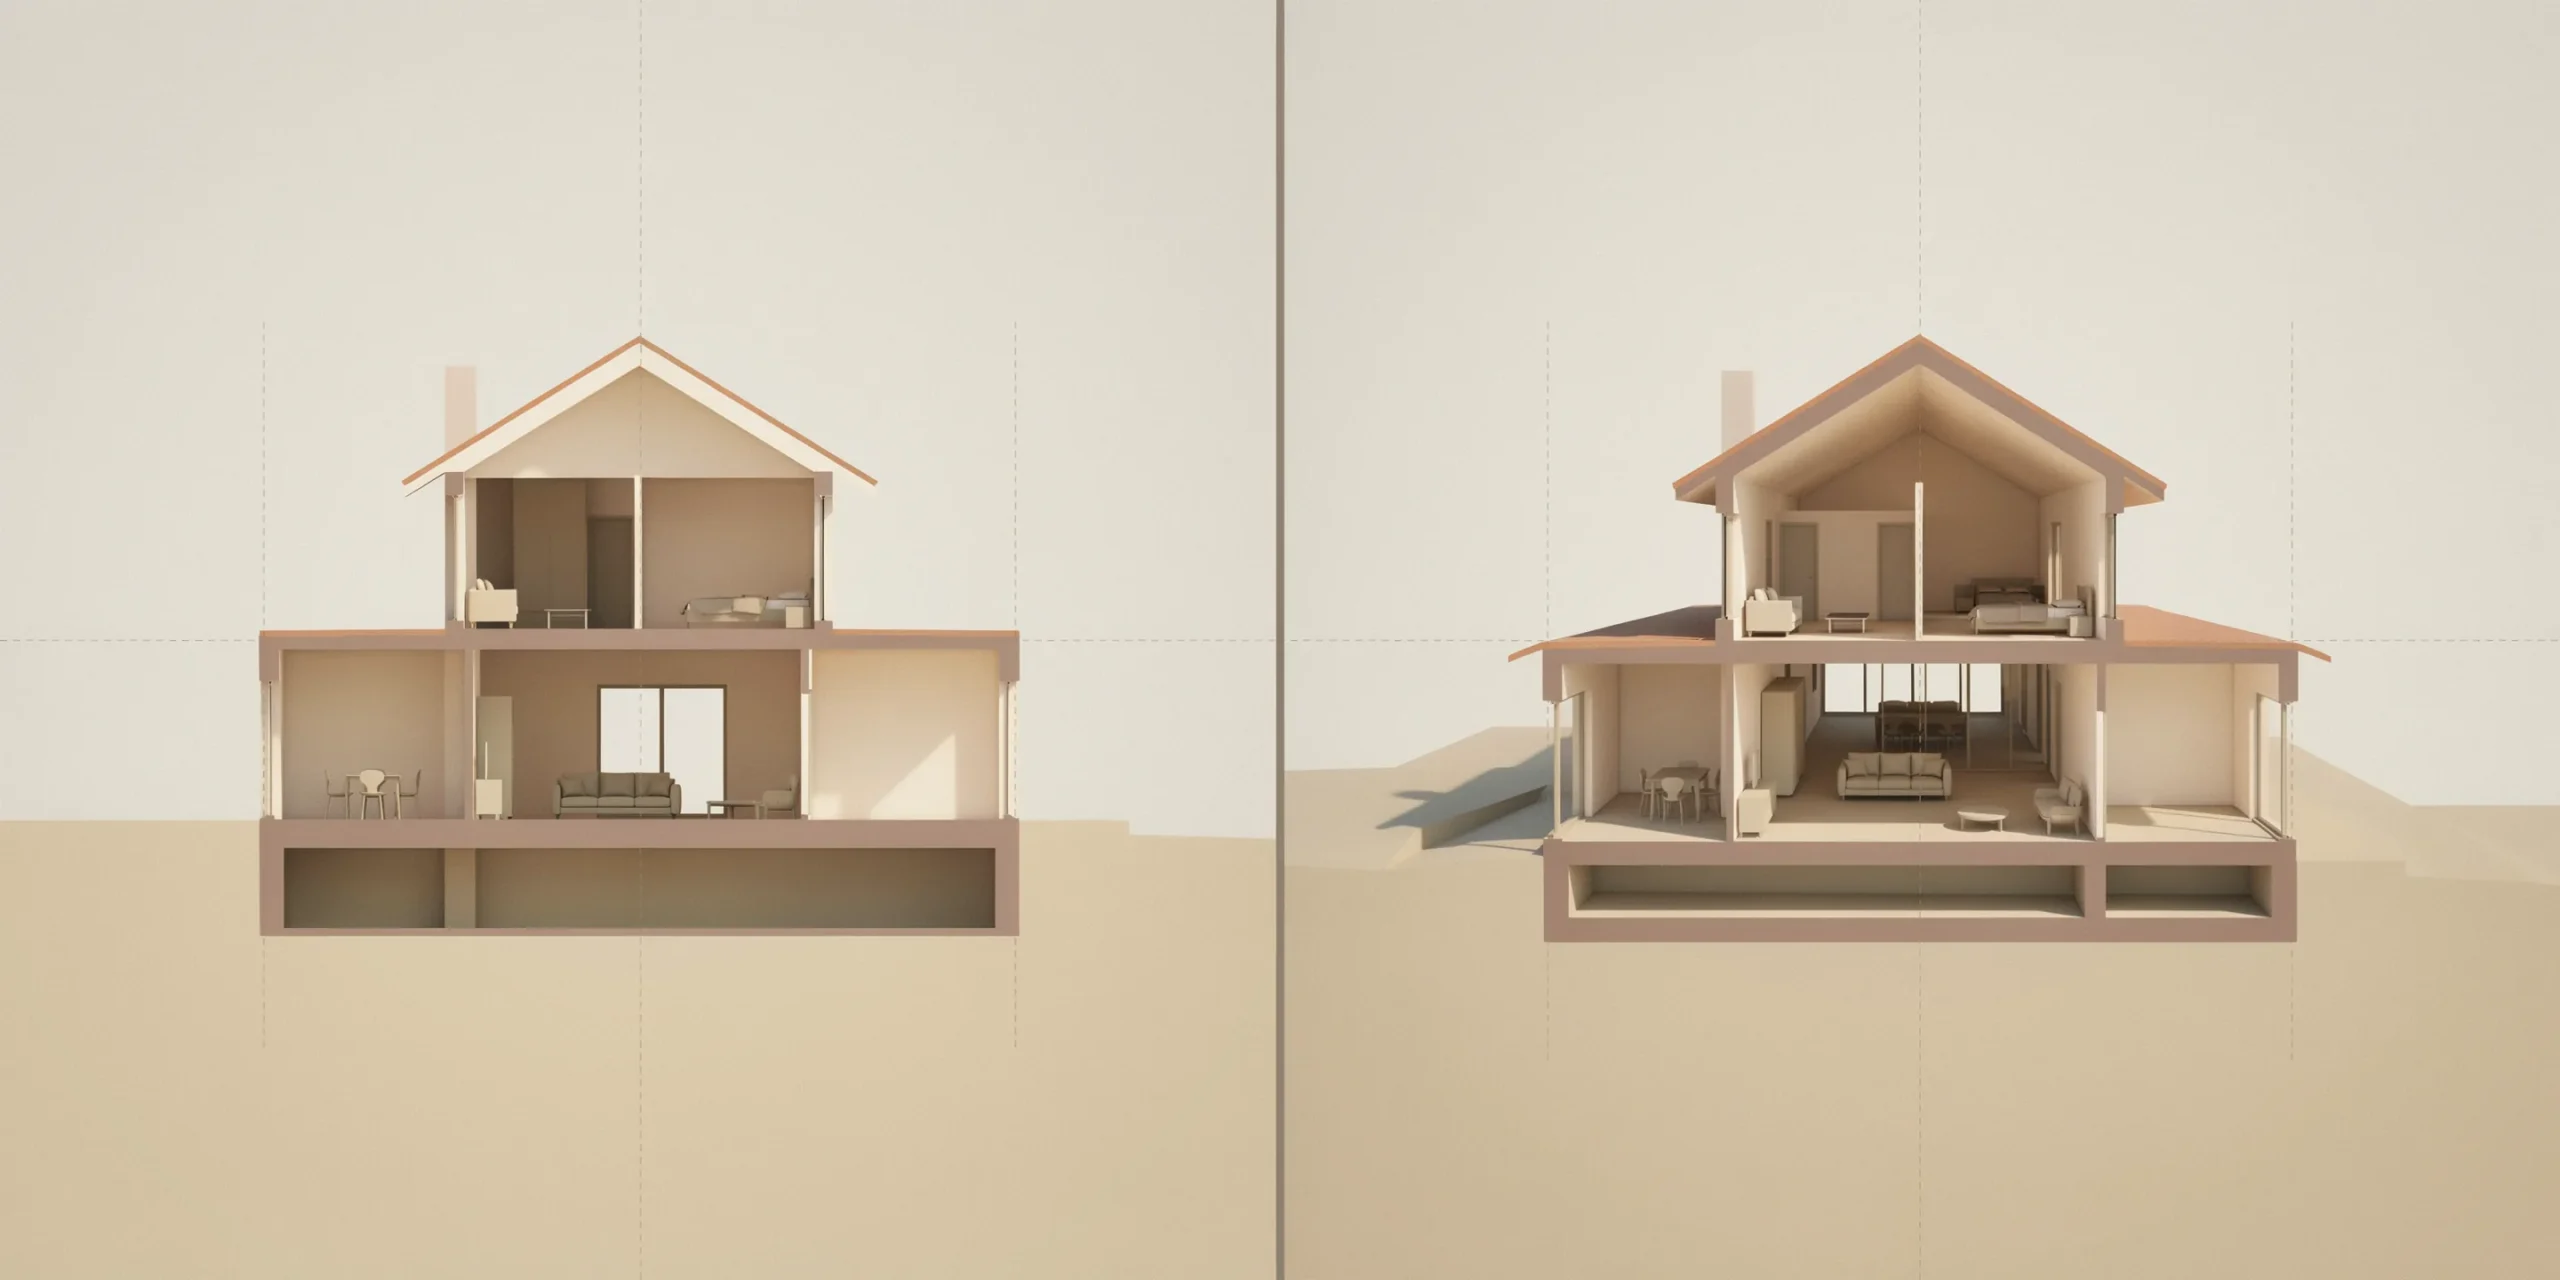
A standard section is orthographic. Lines stay parallel, nothing converges, and depth is implied through line weight or poche alone. A sectional perspective keeps the same cut but renders the space behind it with a vanishing point, so the back wall sits visibly further away than the cut face. You gain spatial realism and lose precise measurability. Most architects use the orthographic section for documentation and the section perspective render for communication.
When Should You Use a Cutaway Render?
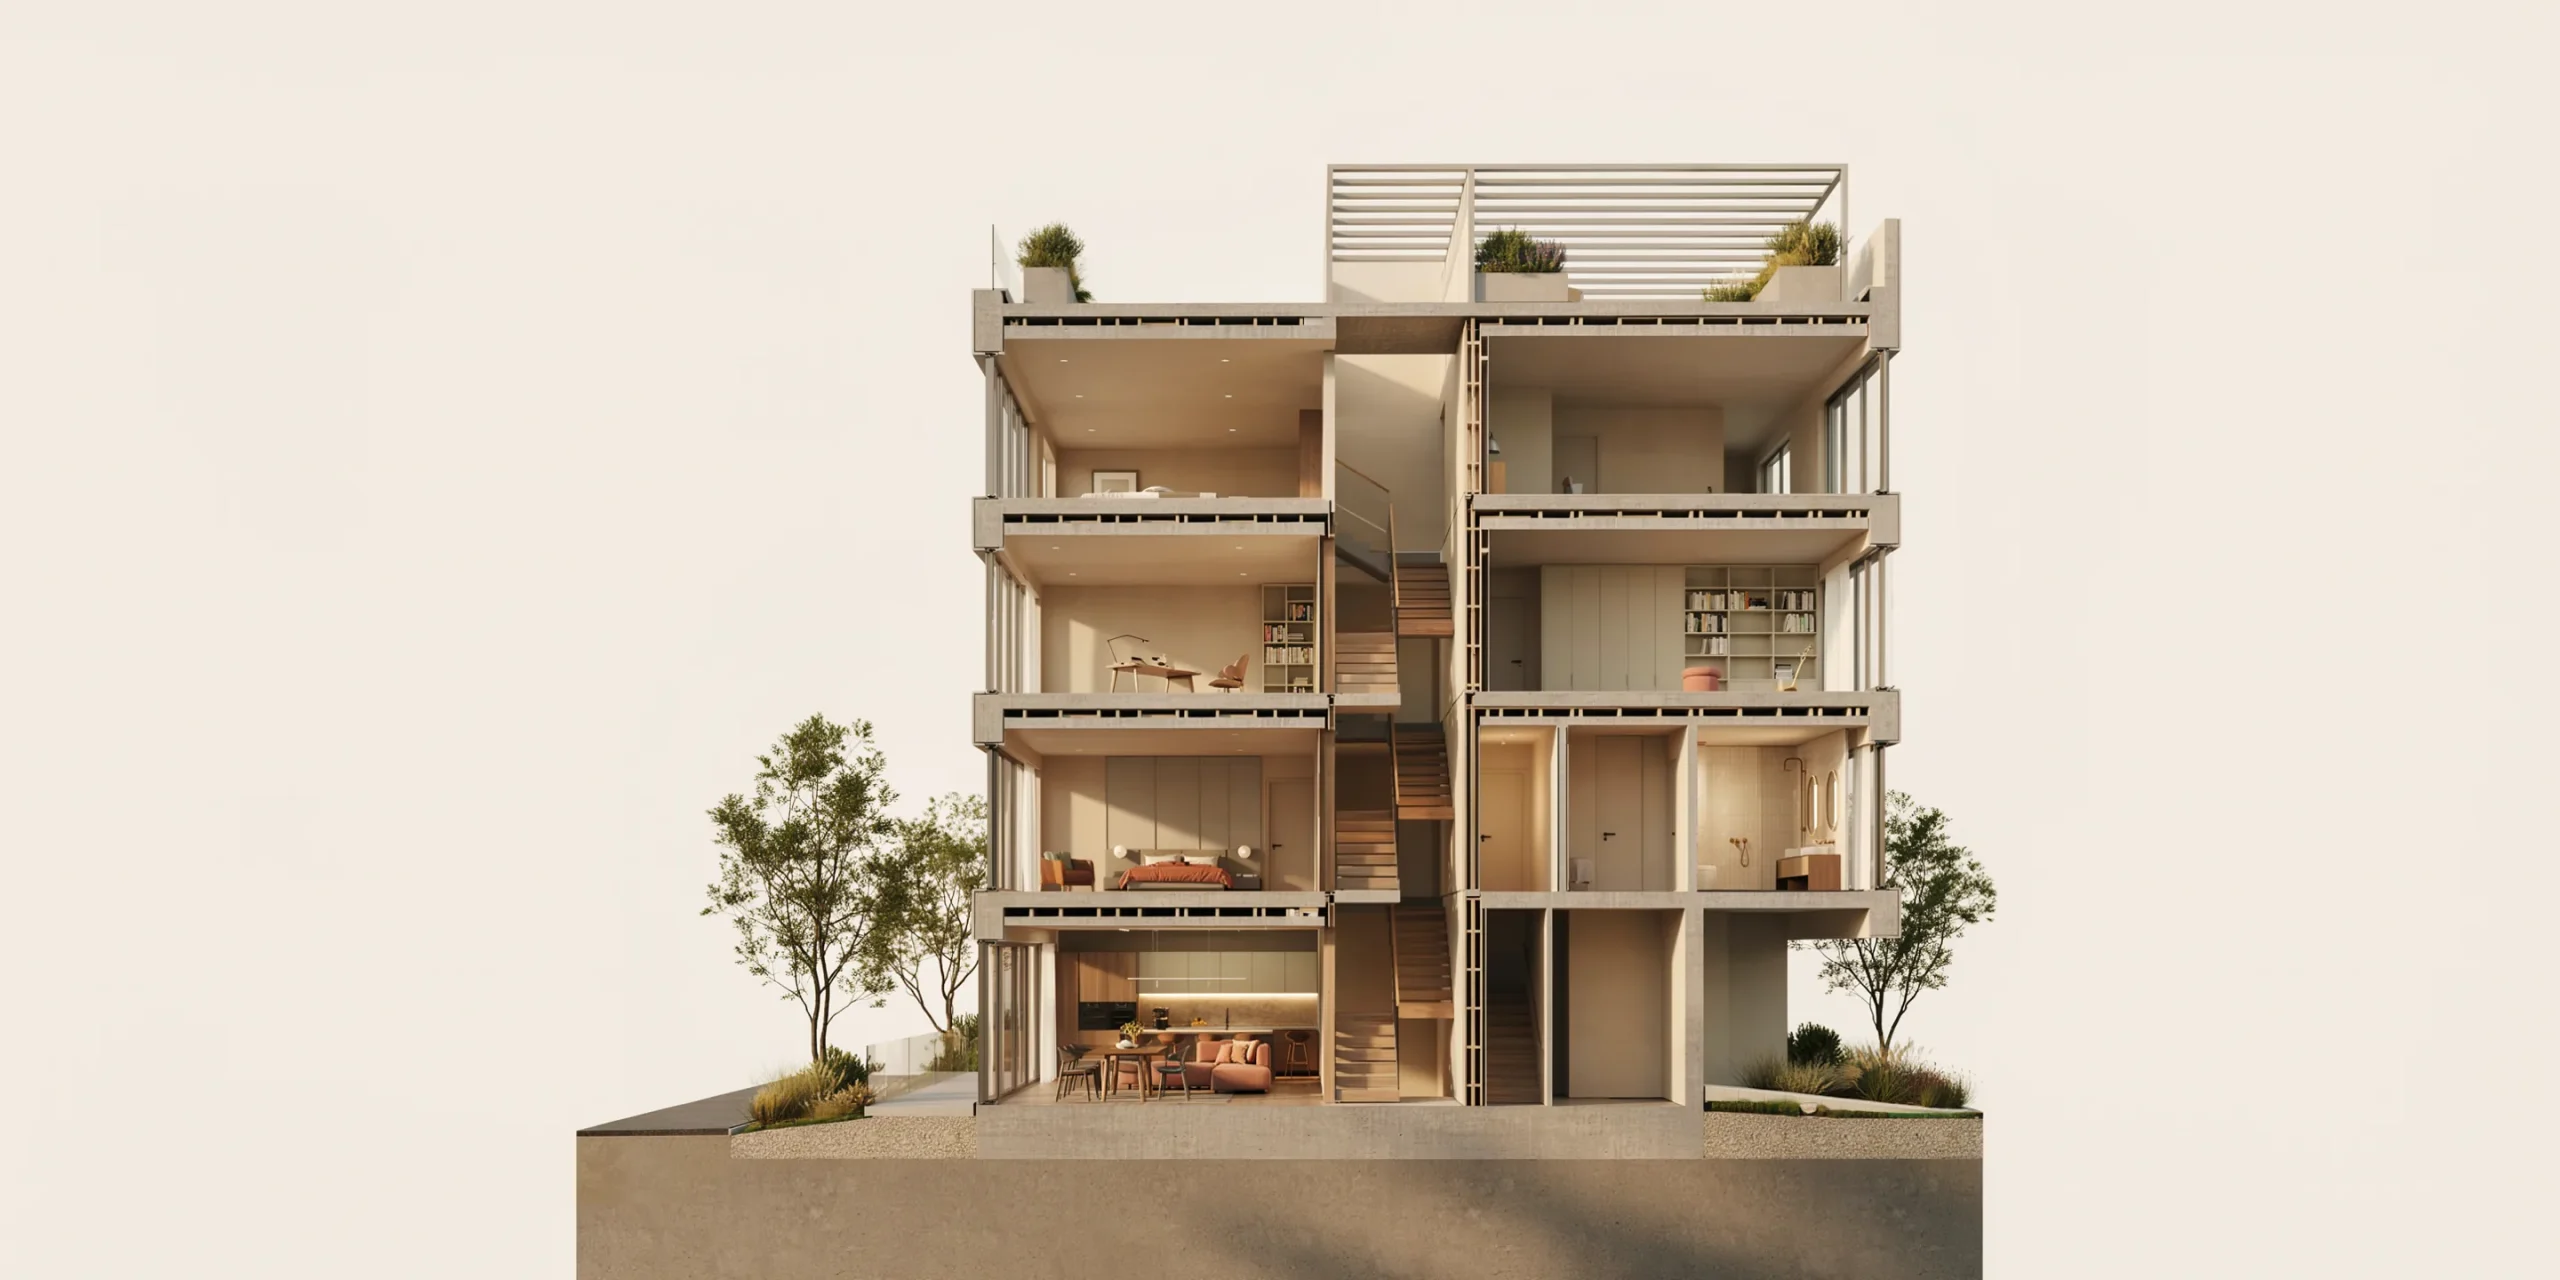
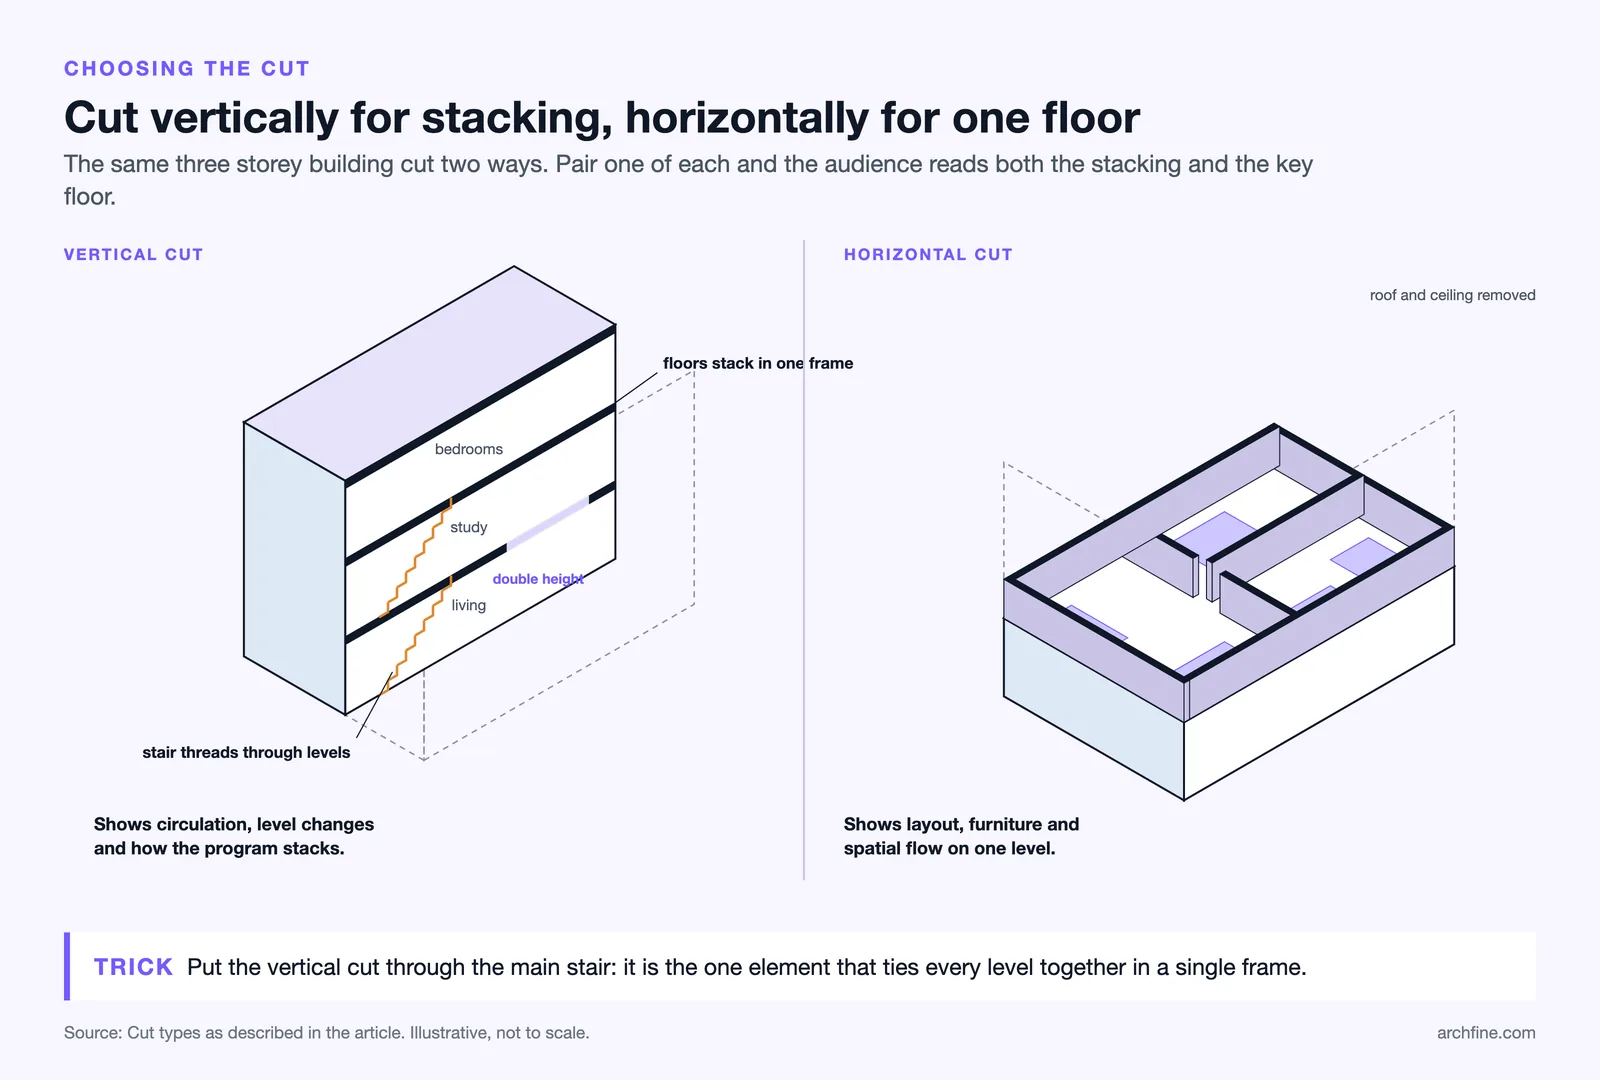
A cutaway render earns its place when the story is interior or sectional rather than about a single facade. Reach for it when you need to show how a double-height atrium connects floors, how a stair threads through a townhouse, or how mechanical and structural systems coexist behind a finished surface. It is the default presentation drawing for housing sections, museums, theatres, and any project where the experience lives inside.
There are two broad cuts to choose from. A vertical cutaway slices the building down through its height and is best for showing circulation, level changes, and the stacking of programs. A horizontal cutaway removes a roof or ceiling to reveal a floor plan in three dimensions, which suits layout, furniture, and spatial flow on a single level. Many presentations pair one of each so the audience reads both how the building stacks and how a key floor works.
🏗️ Real-World Example
Sectional perspectives in competition boards: Across major open competitions, the long section perspective has become a near-standard panel because it lets a jury read program, structure, and light in one frame. Many offices now lead presentation boards with a single oversized section perspective rather than an exterior hero shot, because the cut explains the idea faster than a facade can.
How to Make a Section Perspective Render
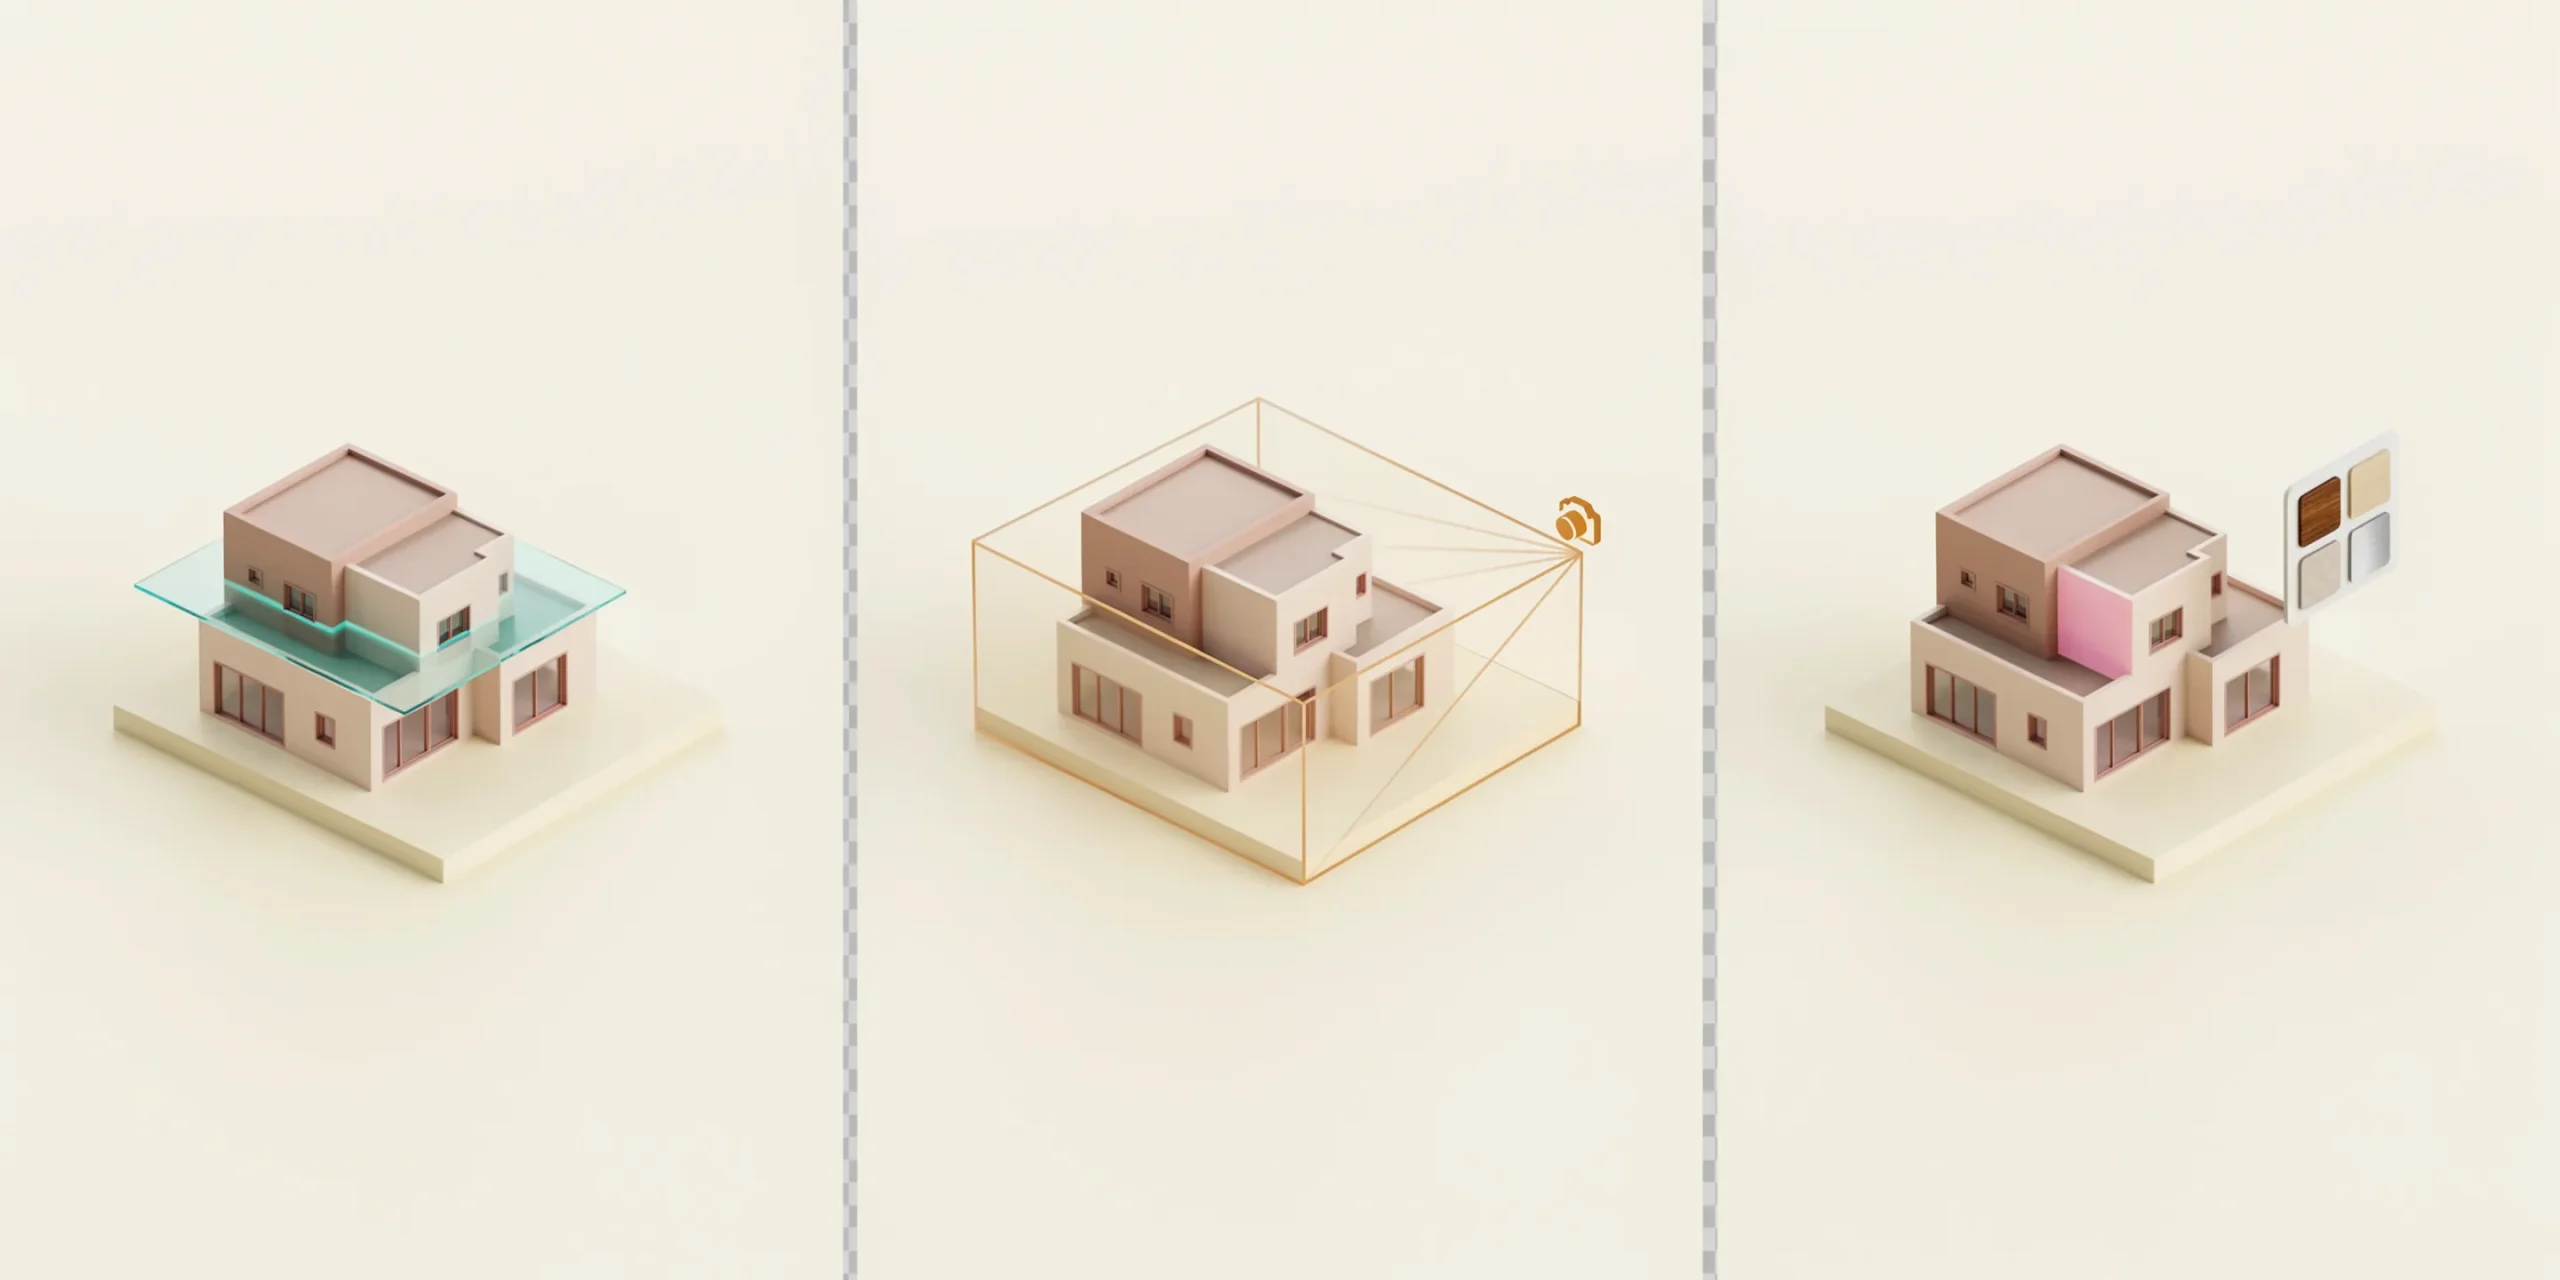
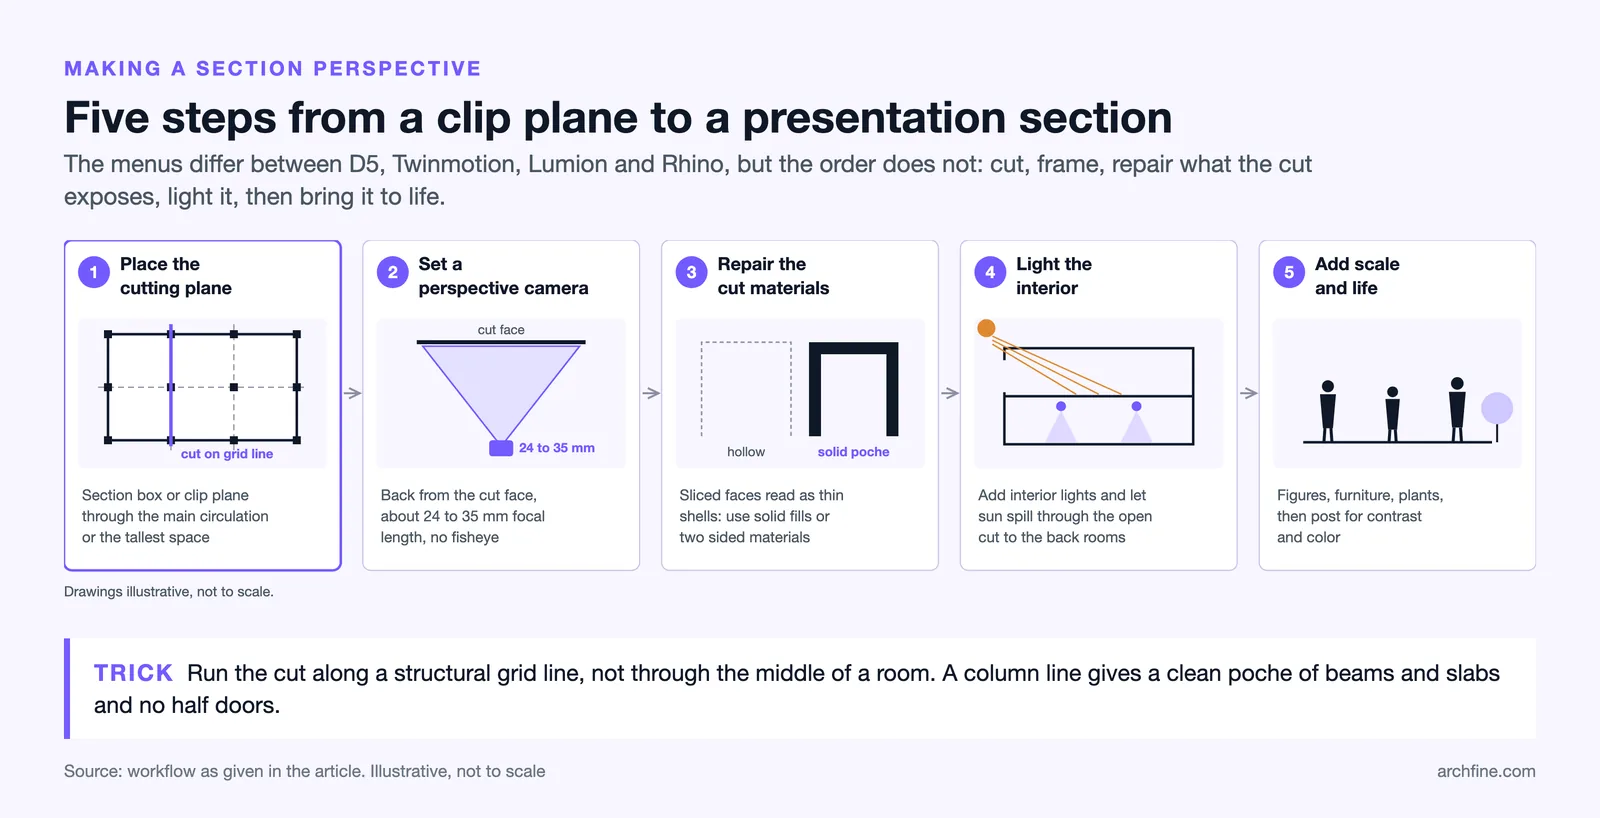
The workflow is consistent across tools even though the menus differ. You place a cut, frame the perspective camera, fix the materials exposed by the cut, then light and grade the scene. The steps below describe the general process before the software-specific notes.
- Place the cutting plane. Position a section box or clip plane where it reveals the most informative slice, usually through the main vertical circulation or the tallest space.
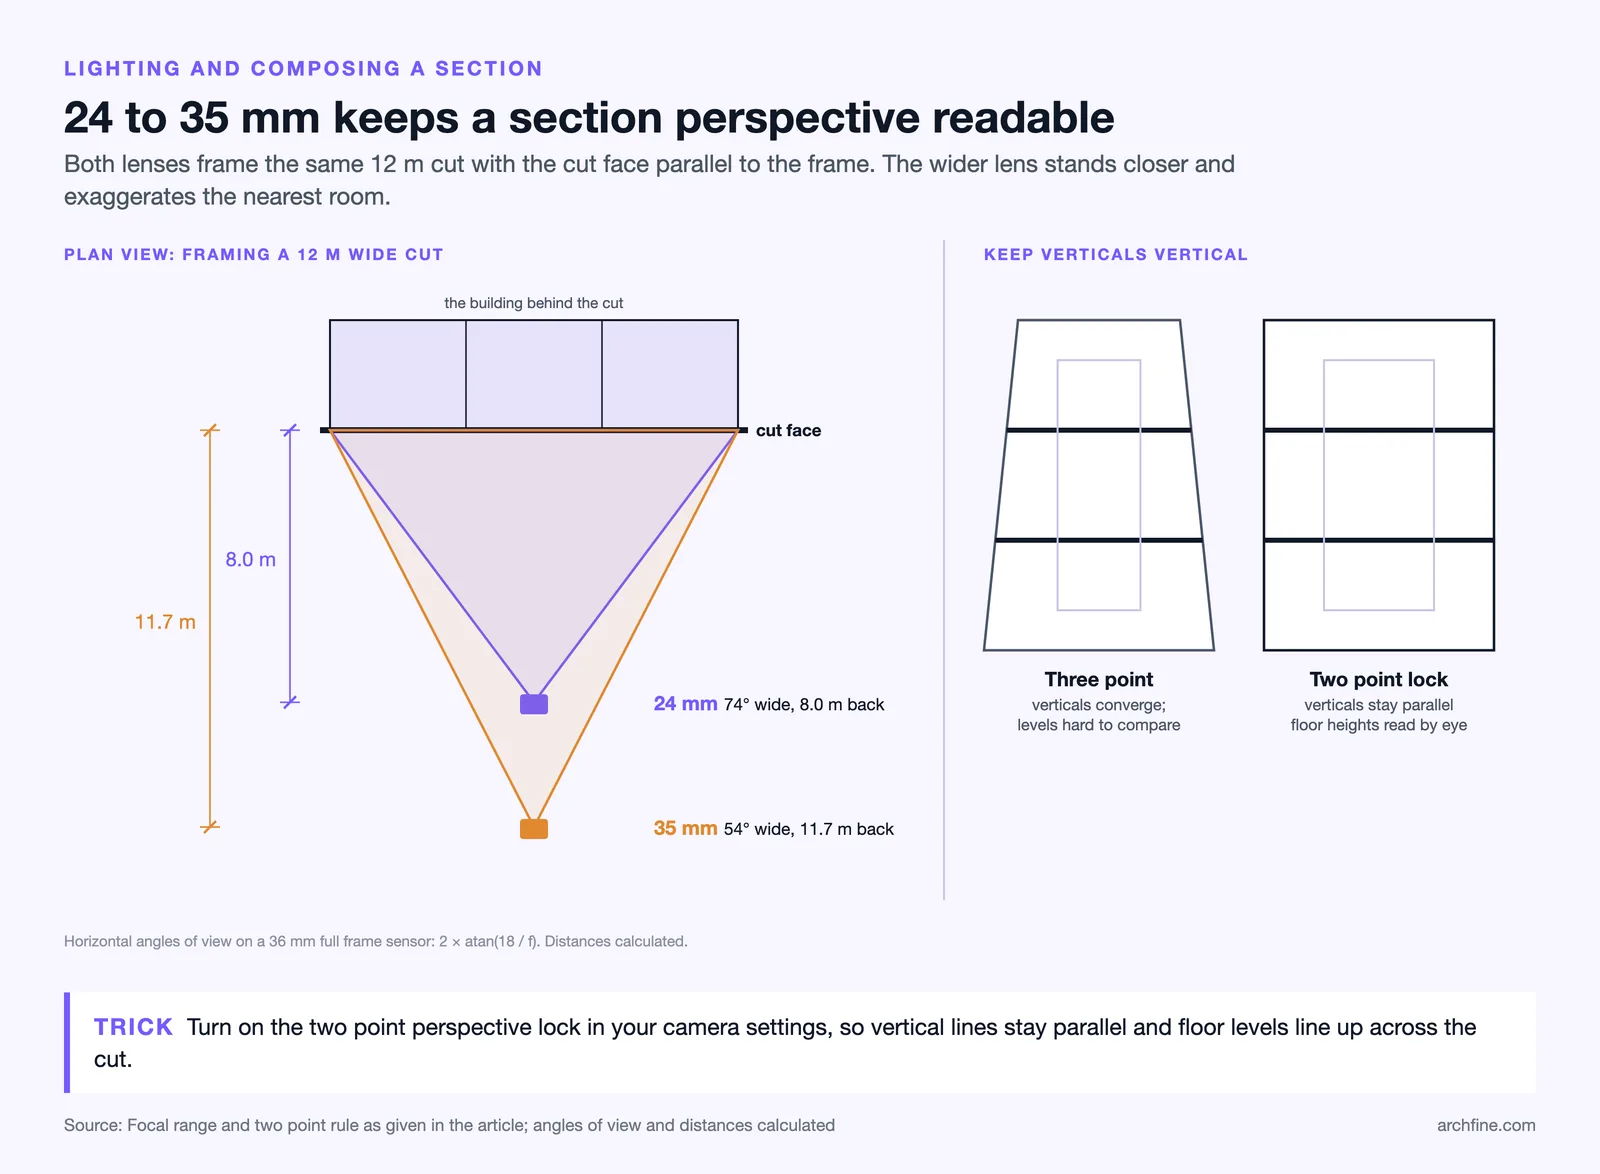
- Set a perspective camera. Move the camera back from the cut face and use a focal length around 24 to 35mm so the interior reads with natural depth, not a fisheye exaggeration.
- Repair the cut materials. Surfaces sliced by the plane often appear as thin shells, so assign solid section fills or two-sided materials and walls and slabs read as mass.
- Light the interior. Interiors lose daylight once enclosed, so add interior lighting and let exterior sun spill through the open cut to keep the back of the space legible.
- Add scale and life. Drop in figures, furniture, and vegetation, then post-process for contrast and color so the section reads at presentation size.
💡 Pro Tip
When you place the cut, line it up with a structural grid line rather than mid-room. A cut through a column line gives you a clean, readable poche of beams and slabs at the face, and avoids the awkward sliced furniture and half-doors that make a careless section perspective look unresolved.
Which Software Handles Section Cuts Best?
Most real-time engines now include dedicated section tools. The table below compares how the common archviz applications create a section perspective render so you can match the workflow to the tool already in your pipeline.
| Software | Section method | Cut-face handling | Best for |
|---|---|---|---|
| D5 Render | Section plane and section tube, up to 10 per scene | Adjustable cap color and section diagram mode | Fast real-time section perspectives |
| Twinmotion | Section cut object placed in the scene | Materials set to two-sided to avoid vanishing faces | Animated and static cuts |
| Lumion | Clip plane effect on the camera | Manual section fill geometry recommended | Large landscape and context cuts |
| Rhino and 3ds Max | Clipping plane or section box with capped solids | Full control via section caps and materials | High-precision V-Ray and Corona output |
If you work with a SketchUp or Rhino model, you can cut the section in the modeler and then push the framed view through an AI engine for fast lighting and material passes. Our walkthrough on SketchUp AI rendering shows how that export-and-render loop compresses a multi-hour ray trace into a far shorter cycle for early section studies.
⚠️ Common Mistake to Avoid
Leaving cut walls as single-sided shells is the most frequent error. In Twinmotion and many SketchUp exports, a sliced surface vanishes when viewed from inside because its normal faces away from the camera. Set those materials to two-sided, or add a capped solid, so the section reads as solid mass rather than a hollow cardboard model.
How Do You Light and Compose a Section Perspective?
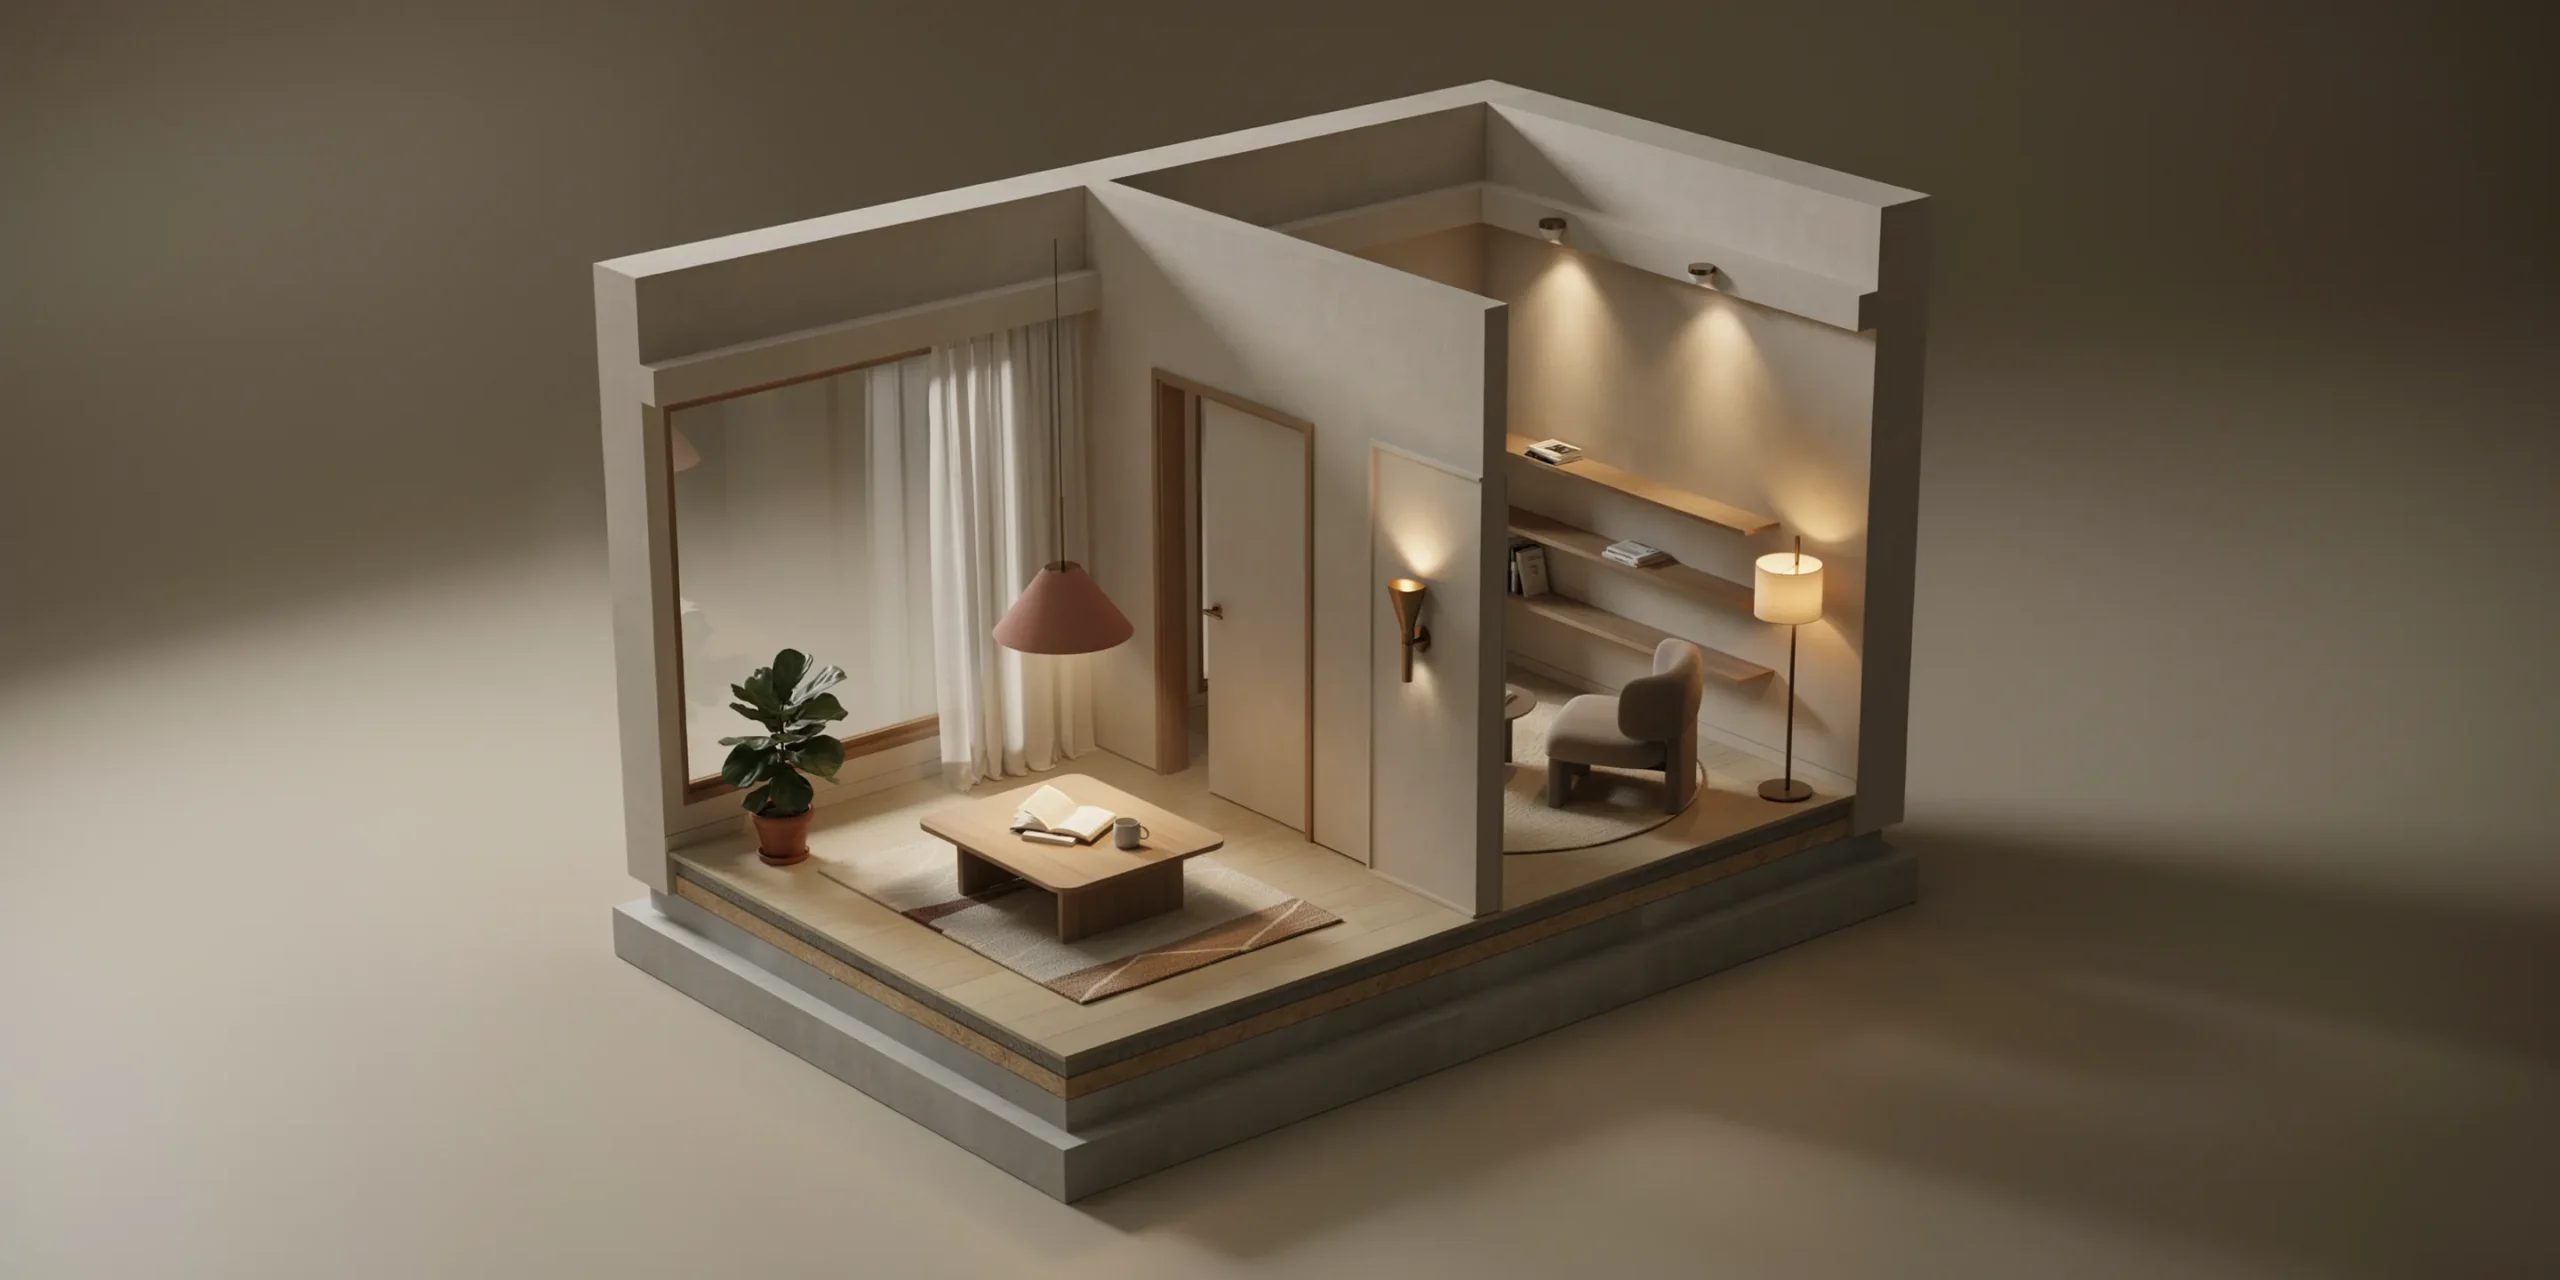
Lighting is what separates a flat cut diagram from a convincing section perspective render. Because the cut opens one whole face of the building, daylight floods the front rooms while deeper spaces fall dark. Balance this by adding interior light sources, area lights at windows, and a controlled sun angle that rakes across the section rather than blasting it head-on. Raking light reveals the depth of beams, balconies, and reveals that define the spatial story.
Composition follows the same logic as any interior render, with one extra rule: keep the cut face roughly parallel to the image frame. A near two-point perspective, where verticals stay vertical and the section plane reads almost flat, lets the audience compare floor heights and align levels by eye. Steep three-point angles look dramatic but destroy the measurable quality that makes the drawing useful. The same balance of light, material, and framing appears in our breakdown of what makes a great architectural render.
📐 Technical Note
For a readable section perspective, keep the camera focal length between roughly 24mm and 35mm full-frame equivalent and enable a two-point perspective lock so vertical lines stay parallel. Wider lenses stretch the edges of the frame and exaggerate the nearest room, which undermines the comparative reading between levels that the section is meant to deliver.
How Do You Use a Section Perspective for Storytelling?
The strongest section perspectives are edited like a narrative. Decide on the one idea the cut must communicate, then suppress everything that competes with it. If the story is a continuous public stair, populate it with figures moving up and down, light it brightest, and let surrounding rooms recede into quieter tones. A section perspective render that tries to show everything at full intensity ends up showing nothing clearly.
Scale figures do double duty here. They confirm the size of spaces and they direct the eye through the section, acting as characters in the spatial story. Group them where you want attention, leave deeper rooms sparsely occupied, and vary their poses so the cut feels inhabited rather than staged. Whether you push for photoreal or graphic output depends on the audience, a choice covered in depth in our comparison of photorealistic versus stylized renders.
📌 Did You Know?
The inhabited section perspective as a presentation device traces back to figures like Auguste Choisy, whose 19th-century worm’s-eye axonometric sections in Histoire de l’architecture combined plan, section, and structure in one projected image. Modern real-time engines have revived that same combinatory drawing for digital competition boards.
Frequently Asked Questions
Is a section perspective the same as a cutaway render?
They overlap but are not identical. A cutaway render removes any part of the envelope, including roofs or corners, to expose the interior. A section perspective specifically cuts along a flat plane and renders the result in perspective. Every section perspective is a cutaway, but not every cutaway is a clean planar section.
Can you make a section perspective render from a BIM model?
Yes. Revit, ArchiCAD, and Vectorworks all generate perspective section views natively, and you can sync those models into D5, Twinmotion, or Lumion to render them. The main task is cleaning up the cut materials so BIM objects sliced by the plane show solid section fills instead of hollow faces.
What focal length works best for a sectional perspective?
A focal length around 24mm to 35mm full-frame equivalent keeps depth natural while still capturing a tall interior. Pair it with a two-point perspective so vertical lines stay parallel and floor levels remain easy to compare across the section.
Where to Go From Here
✅ Key Takeaways
- A section perspective render cuts a building on a plane and renders the interior in perspective, combining section clarity with spatial depth.
- Align the cut with a structural grid line and repair sliced materials with two-sided faces or solid caps.
- D5, Twinmotion, Lumion, and Rhino each have dedicated section tools; pick the one already in your pipeline.
- Keep the focal length near 24 to 35mm with a two-point perspective so floor levels stay comparable.
- Edit the scene around one spatial idea and use scale figures to guide the eye through the cut.
Your Next Step: Open your current model, drop a section box through the main stair, and render a quick two-point view at 30mm. That single test cut will tell you faster than any tutorial whether your materials and lighting are ready for a presentation-grade section perspective.
For deeper software references, see the official D5 Render section documentation, the Twinmotion real-time toolset, and the broader history of architectural representation discussed at ArchDaily and through Robin Evans on the theory of the projective drawing.